ACROSS Shipment Processing

Main Menu: 13 - 1 (Shipment Entry)
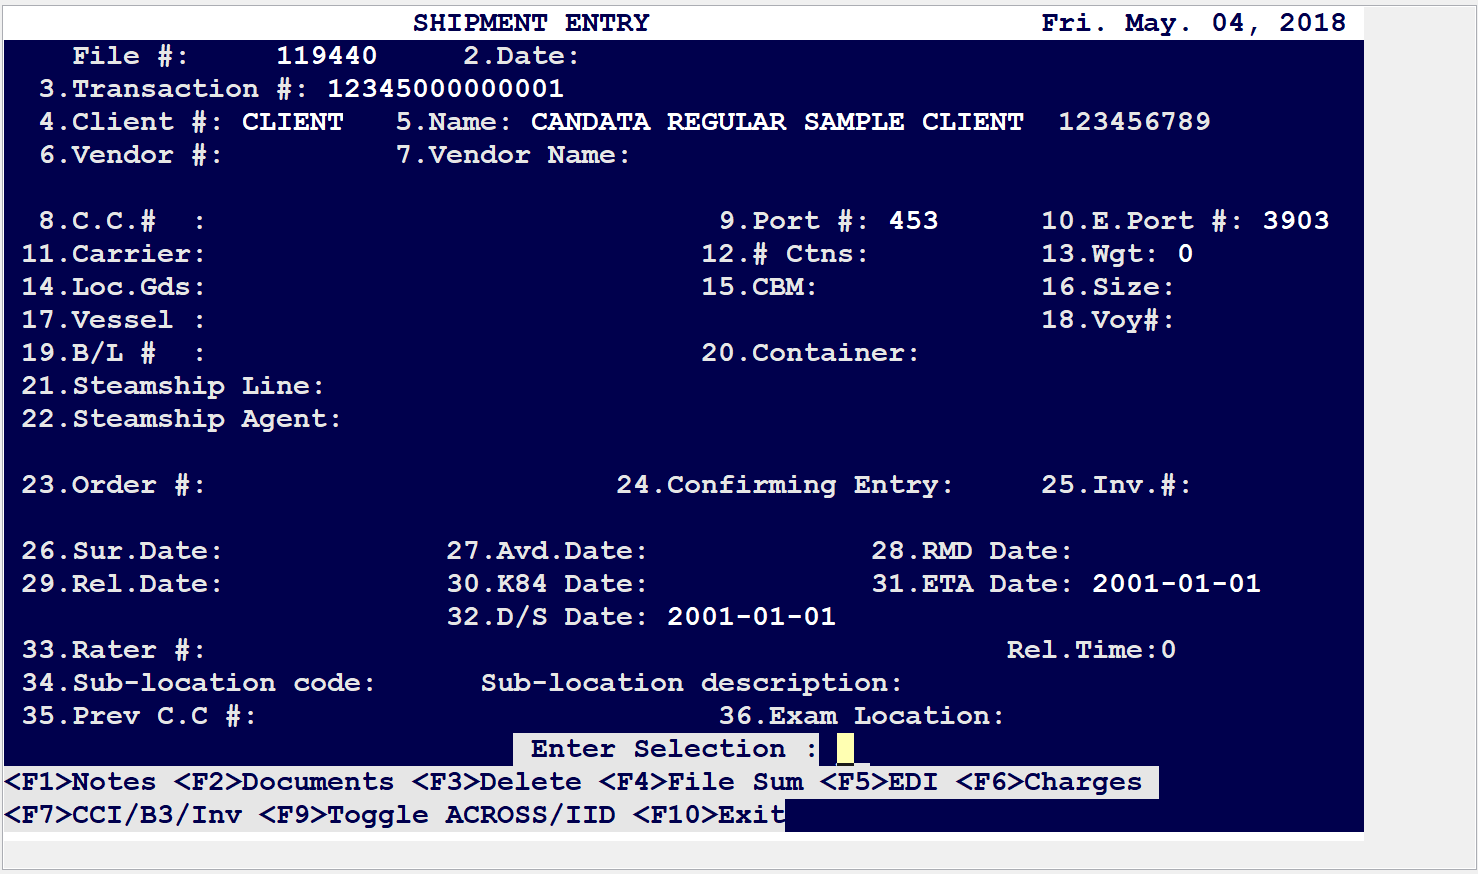
On the first screen, enter information from the shipment manifest, bill of lading and/or invoice.
Overview- Required Data Fields
Field 3 auto-populates when selecting Enter. Fields 4 & 6 are search driven (F1) which auto-populate
Fields 5 & 7 after selecting Enter. Fields 8 & 9 are mandatory details from the manifest and Field 10 is required for Pre-Arrival Review System (PARS) shipments. (If PARS or shipment that provides an US exit port) 11 (generates automatically after hitting enter) 12, 13, 17,18,19,20,22,23,25 (if both PO and Invoice are listed enter both) 32 (taken from the bill of lading) 34 (taken from the manifest)
FIELD BREAK DOWN
Each shipping manifest will have a different layout. All entry information for this lead screen is on the manifest (except invoice/P.O. Number)
Select Enter until Field 4 - this is the Importer of Record (mainly Triumph’ client). Select F1 to search the database for the Importer of Record/client. Type the name of the Purchaser/Importer from the shipment custom documents, search and select via the Enter button. If not found, search by address, contact, Importer of Record or reconfirm with your supervisor prior to proceeding.
Select Enter to forward through Field 5 as it will auto-populate from the client selected. For Field 6,
Select F1 to type in the vendor name. If the vendor name does not appear, Add the provided vendor
name to the database. F1 and select “New”
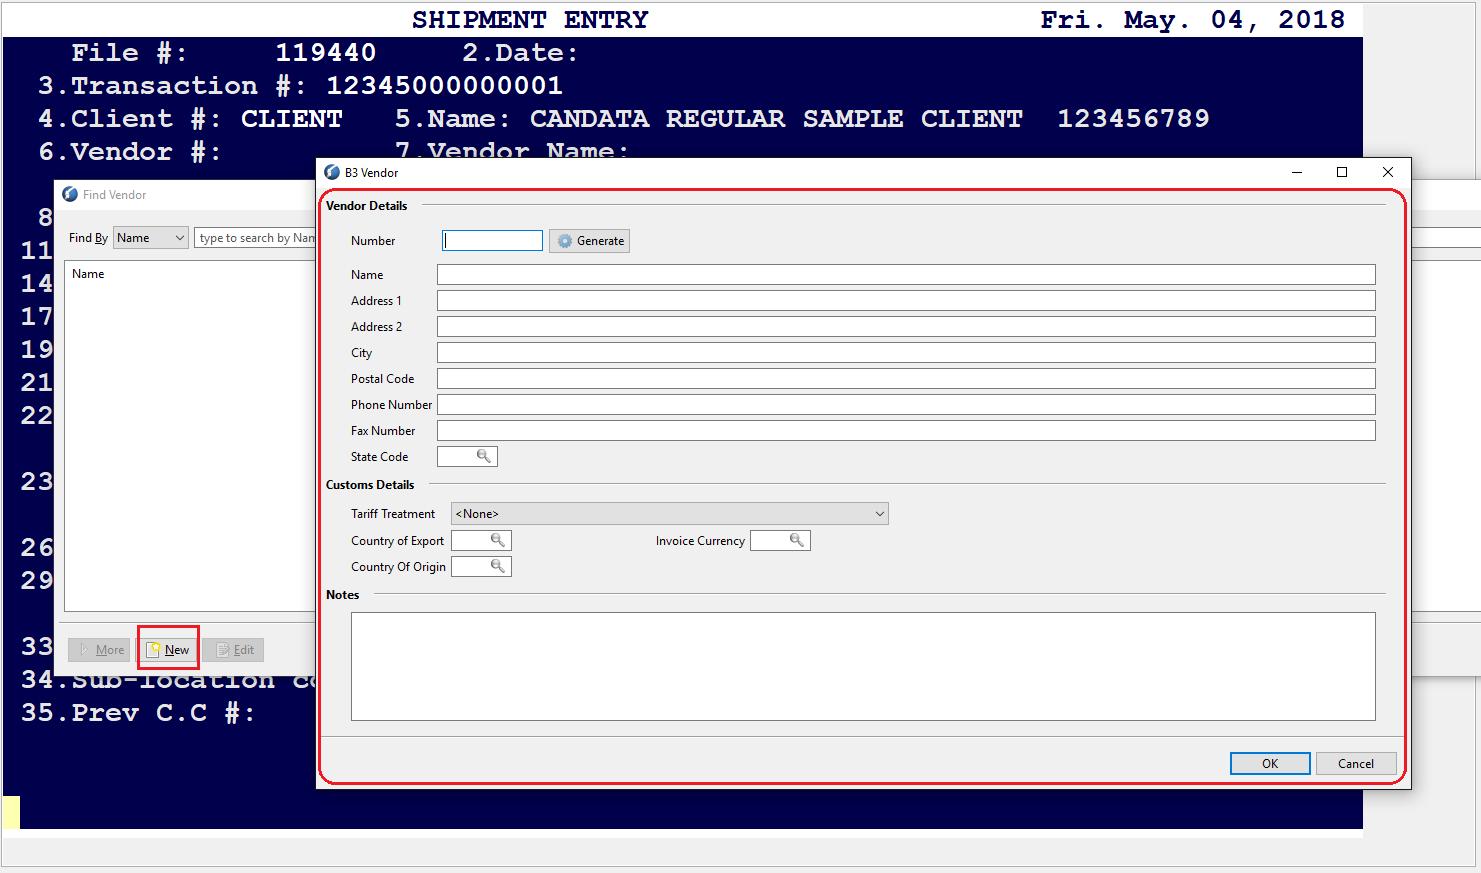
Enter the information from the shipment custom documents to add the vendor details.
To generate the vendor number: use alphanumeric, (first 3 letters of the vendor name and the first 4 digits off the address) * If there are not enough numbers in the address to fill the space use a sequential format adding a number starting at zero at the end of each address.
Example: Spice & Seasoning Specialties, Lot 1958, Suth St. India
This would be entered as “SPI1958” If there were only 3 numbers to the address it would be “SPI1950” The custom related details in this B3 Vendor box, are Tariff Treatment (Enter 2 unless Preferential
Certificates are available and confirmed for use by a Supervisor), Country of Export (where the goods are shipped FROM), Currency of Settlement (from the Canada Customs Invoice (CCI)/Commercial Invoice(CI)) and the Country of Origin (CCI/CI, Form A etc).
Select OK and proceed to Enter towards Field 8.
Field 8: Enter the Cargo Control Number from the shipment manifest. This number will differ depending on the mode of transportation; PARS, Air, or Ocean. Carrier Codes always have four-digits. Therefore some carrier codes include a dash (-). Example Fedex (400-). Select Enter
Field 9: Port # - (Final destination) is the Canadian Port of Entry as provided on the shipping manifest. (Ex. Vancouver BC- 0809) Select Enter to Field 12.
Field 12: Enter the total number of PKG, (piece count/cartons) from the manifest; Select Enter.
Field 13: Enter the total Gross Weight in KGM. (If in LBS, Select F3 and enter the LBS the system will convert to KGM. Select Enter.
Field 17: Enter the Vessel Name. Select Enter
Field 18: Enter the Voyage Number. Select Enter
Field 19: Enter the Bill of Lading number. Select Enter
Field 20: Enter the Container Number from the manifest (it will be alphanumeric). WATCH – Be sure NOT to key the seal number which follows the container# on the manifest. Select Enter
Field 22: Enter the Steamship Agent which is normally the header name provided on the manifest (Ex. ZIM, MOL). Select Enter
Field 23: Enter the Purchase Order or Invoice number from the CI/CCI. Select Enter towards Field 32
Field 32: The Date of Direct Shipment or shipped on board date/laden on board is found on the Bill of Lading. Select Enter
Field 33: will auto-populate to the user profiled.
Field 34: The Sub-Location code is where the physical goods/cargo are situated. It is a 4 digit code. If PARS shipments, there will NOT be a sub-location code. All other modes of transportation require a sublocation code. Select F1 to search the database by sub-location code name. Select Enter until thebottom of the screen is reached. Select F2 to add the scanned shipment documents to the shipment file. A file number will generate itself.
***Save the shipment documents provided by the client/carrier to your desktop.
Once F2 Document has been selected. Select “Import” and retrieve the documents saved from your
desktop. Title the documents accordingly; Manifest/Commercial Invoices/NAFTA/Form A
Certificate, Packing List etc. Select Close.
Then finally for an IID shipment, press on F9 to enable IID where the “IID” on top of the screen
From the main shipment screen Select F7 (CCI/B3/INV). Select CCI from the drop-down list and hit ENTER.
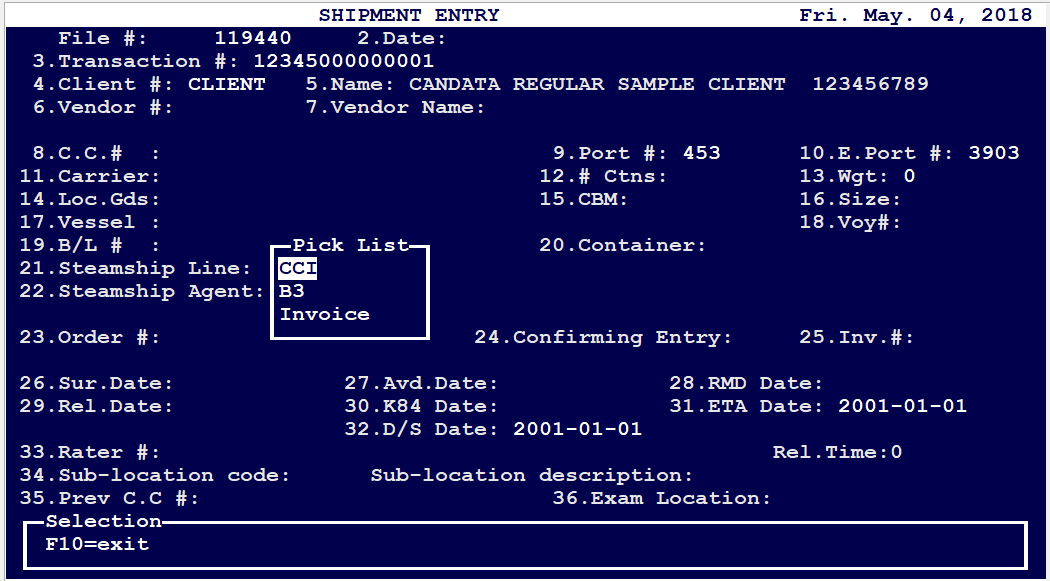
CCI ENTRY
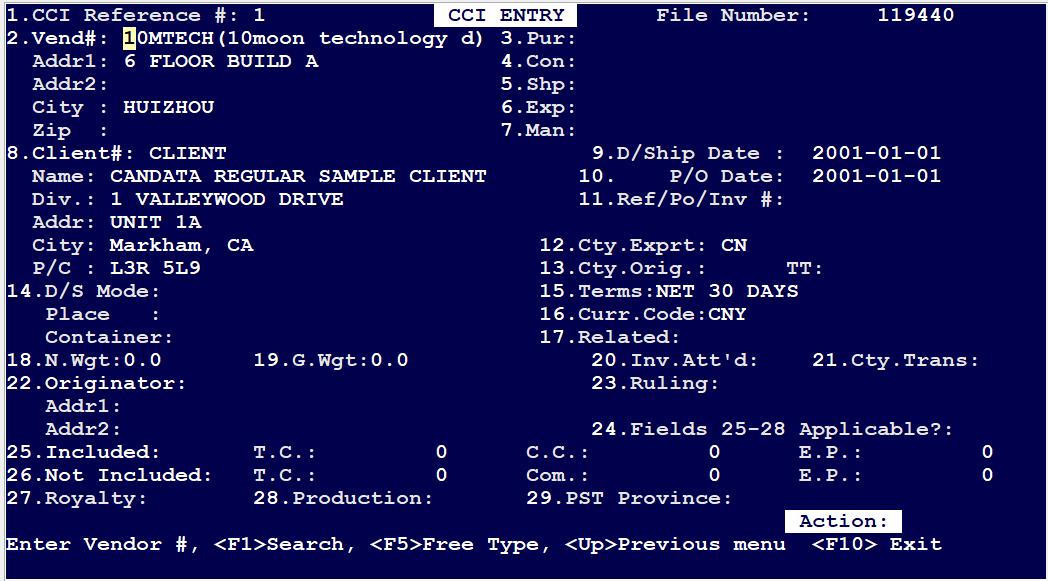
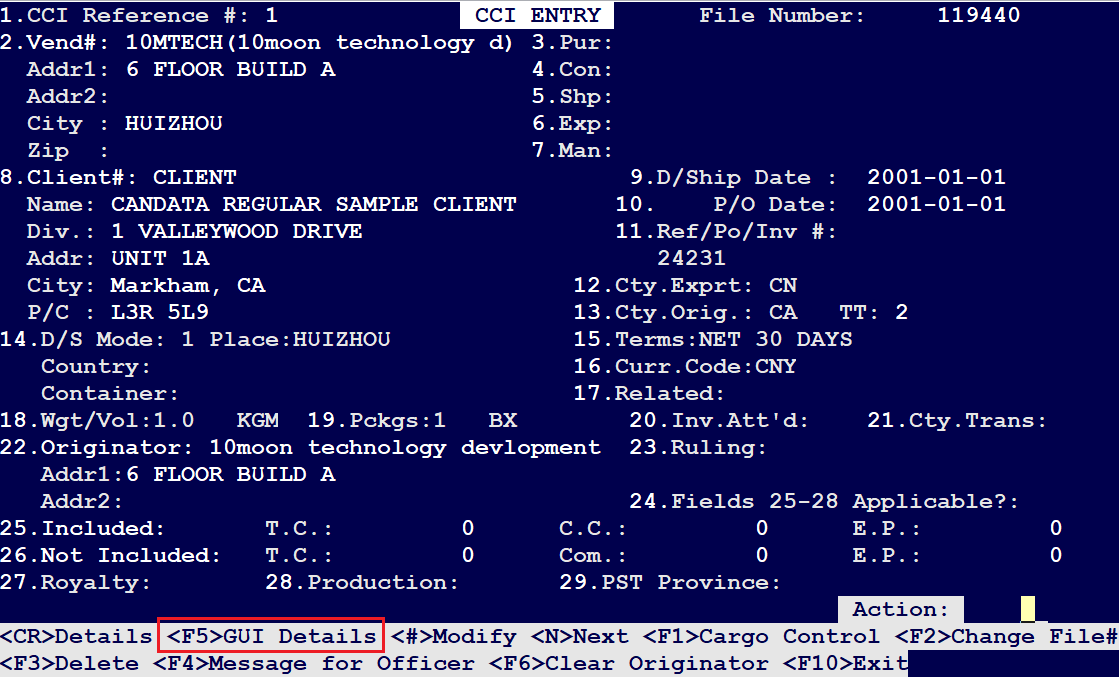
Enter through all fields until you Field 12, as all fields will populate on their own, based on the information from the previous screen.
***Enter the Consignee (Field 4), Shipper (Field 5), Exporter (Field 6) and/or Manufacturer (Field
7) if different/required/applicable.
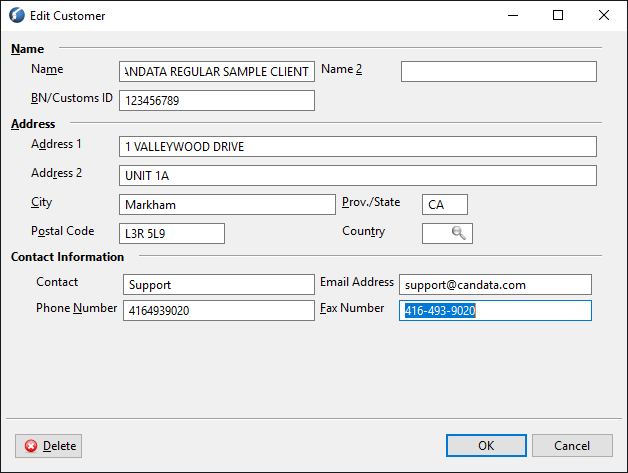
Field 8: Ensure that the Client Information is filled out in FULL.
Field 11: Enter Reference or P.O # is mandatory. This is required for IID
Field 12: Enter the Country of Export (based on the Shippers address). Select Enter
Field 13: Enter the Country of Origin. As provided on the CI/CCI. If not provided, contact the client for written confirmation; attach a copy of this correspondence within the F1 Notes section. Select Enter. TT (Tariff Treatment) - Enter 2 unless confirmation of a Preferential Tariff Treatment has been secured.
(Form A Certificate of Origin/Exporters Statement of Origin) Select Enter.
Field 14: D/S Mode is the Mode of Transportation code. These codes are provided on the bottom of the screen for clarification. Select Enter through towards Field 16
Field 16: Confirm the Currency of Settlement from the CI/CCI. (This may auto-populate from the client/vendor profile previously created) Select Enter towards the CCI Detail Entry Screen.Should edits be required to any field; from the bottom of the screen enter the Field number to be adjusted.
Field 18: Enter the weight value including it’s UOM.
Field 19: Enter the Gross weight including it’s UOM
Press on <F5> GUI Details to access the CCI Detail Entry screen where the shipment lines/products are entered
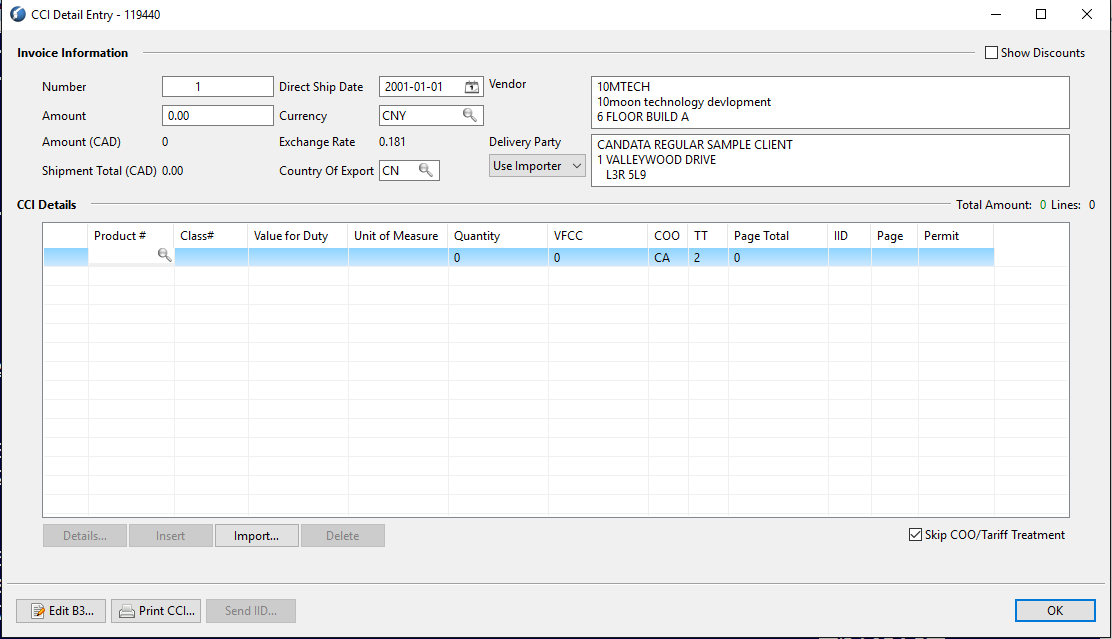
To add new tariff records to the specific client/vendor, the following data is required for entry:
Product # Code: The key word of the product/Part Number
Classification #: HS Code
Description: Is the FULL description of the product in as much detail as possible and relating to the CBSA tariff description.
Vendor Number: F1 to search the specific vendor. Select Enter
Delivery Party: F1 to search the specific Delivery Party or click on “Edit” icon to ADD a party
Country of Origin: Enter in the 2/3 digit-letter code for the COO
Tariff Treatment: Enter the “2” as the default unless a Preferential Tariff Treatment has been confirmed for use by the client or a supervisor.
VFD (Value for Duty) Code: Enter the 2 digit code that starts with a 1 or a 2 - “1” (vendor and purchaser are not related to each other) or “2” (vendor and purchaser are related firms). The second digit relates to the valuation method used; mainly “3” for Transaction Value without adjustments or “4” for Transaction Value with adjustments. Creating a 2 digit code of 13 or 23. See D17-1-10 (g) for additional Value for Duty coding or refer to your supervisor.
Select “OK” when completed. Enter additional products as required.
Shipment Details
Continue to enter all lines from the shipment CI/CCI ensuring the Country of Origin, VFD, TT and GST details are accurate for each line. If line adjustments are required, Enter the line number for editing.
Select F2 to edit the COO/TT. Select F5 to edit the GST/OIC details.
Confirm the UOM (Unit of measure) has been keyed properly and matches the CBSA required data elements. (Ex. NMB, MTK, KGM, LTR etc) Some manual conversions may be necessary. (Ex. LBS to KGM)
Once all shipment lines are complete and confirmed; send the shipment to ACROSS (for Customs release)
Key in your products, CCI detail lines as usual, and the lines which have a “O” under IID, those lines the OGD info needs to be filled out.
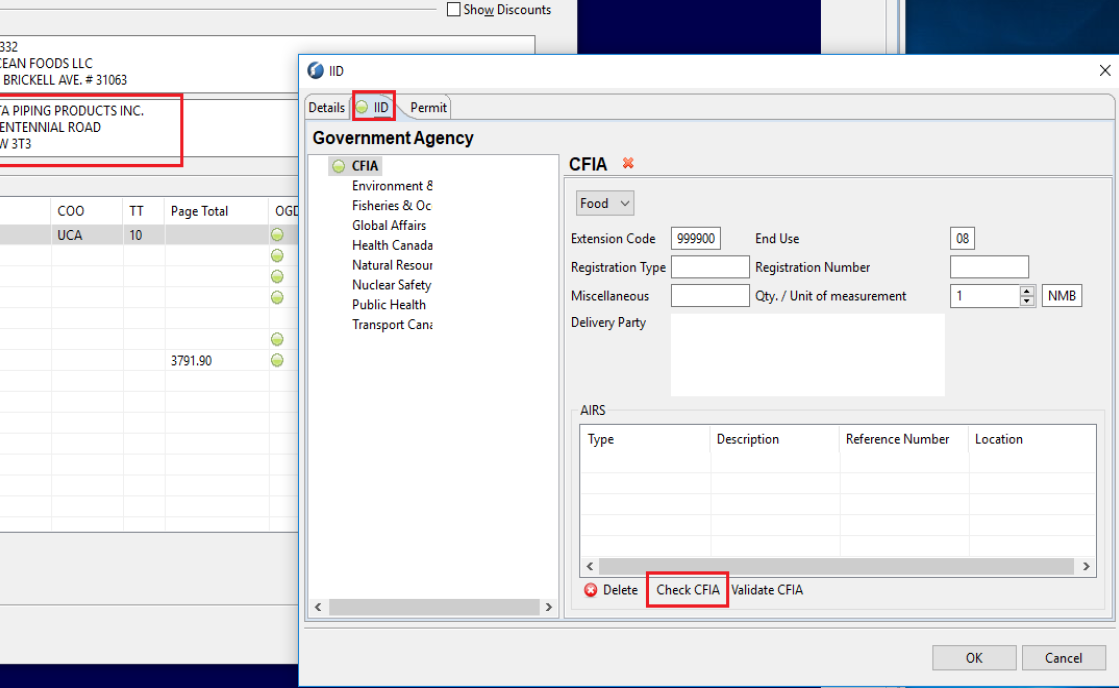
For IID Shipments there are a few special types for OGD which is also known as PGA:
1) CFIA Food
2) Transport Canada – CARS & MotorCycles
3) Meat Products
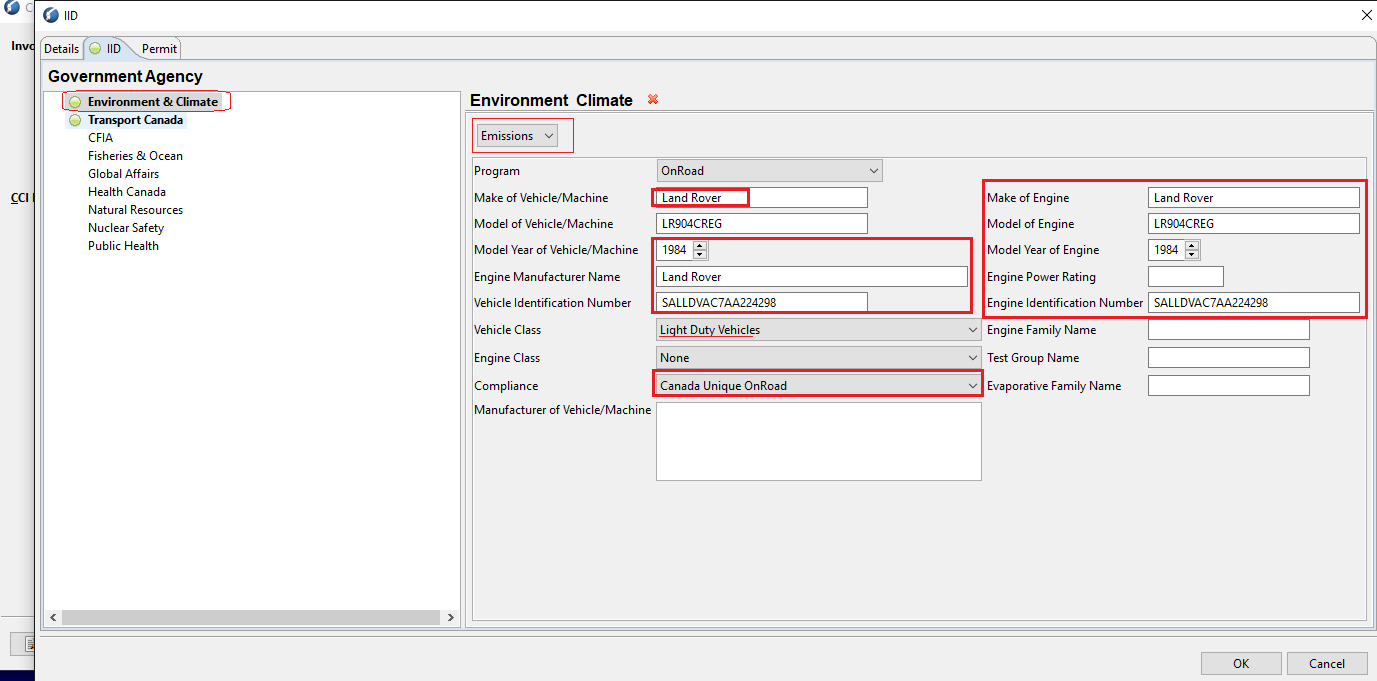
For Transport Canada these are the requirements:
Enter the details for “Environment and Climate” as per the below:
Enter the Details for “Transport Canada”. Please ensure that you Enter the correct VIN Number so that the fields: Make, Manufacturer and Year automatically populate or load.
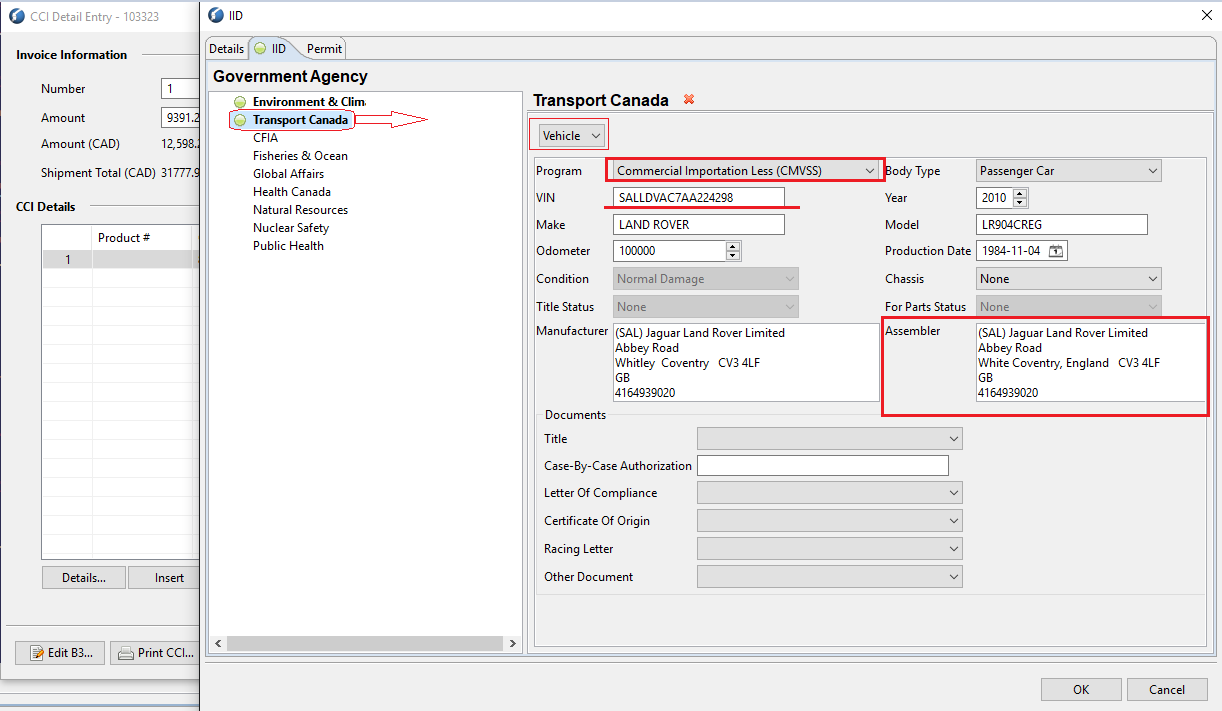
Please fill the following Fields manually:
- Odometer
- Model
- Production Date
- Assembler (This is very important)
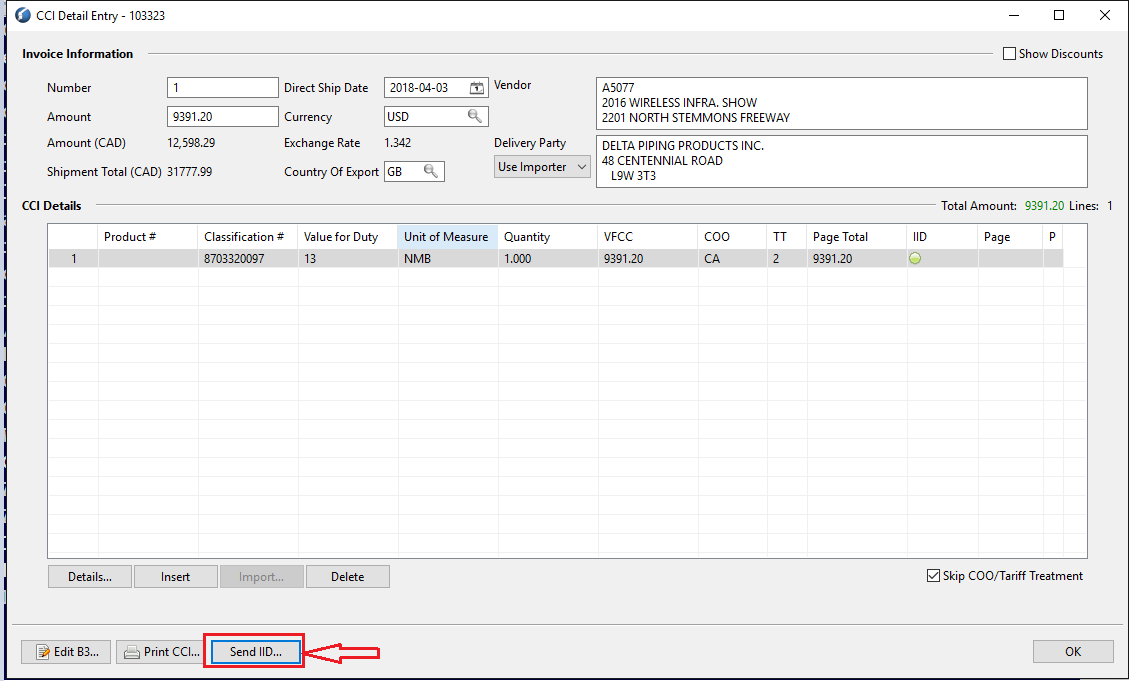
Send Shipment to IID/ACROSS: Please click on “Send IID” on the CCI Detail Entry screen.
For Meat Shipments these are the requirements:
Fill out the CFIA details carefully selecting the right category/classification for your meat product. The lines for which a pull-down menu appears, click on that and select “Manage” which is where the actual LICENSING documents are to be imported and initially sent to Customs for their approval
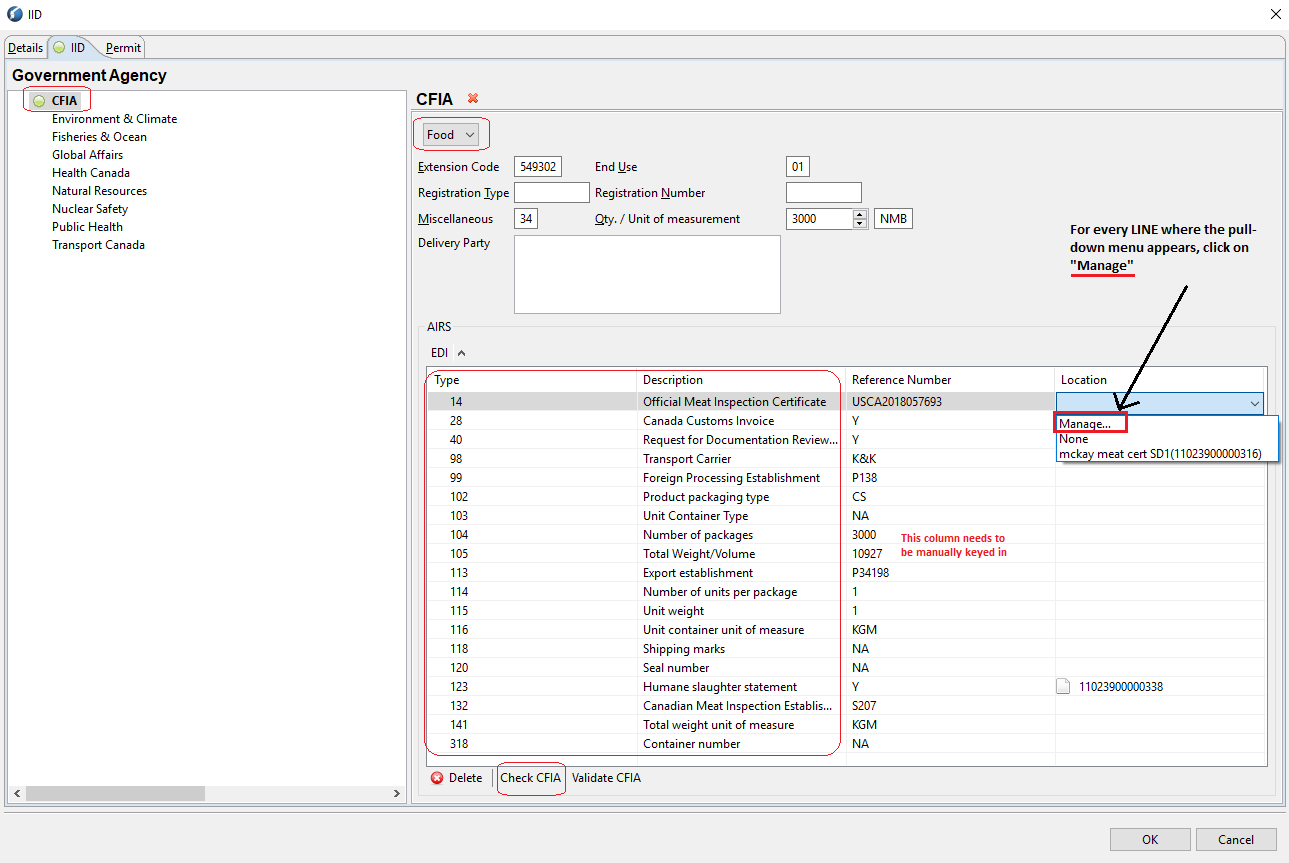
Once ‘Manage’ is clicked, the documents window is launched.
- Click on “Shipment” ensuring it is selected
- Then click on “Import” to import your licensing documents
- Fill out the “Effective Date” and “Expiry” Date
- Then finally click on “Send” to send those documents to Customs for an initial approval
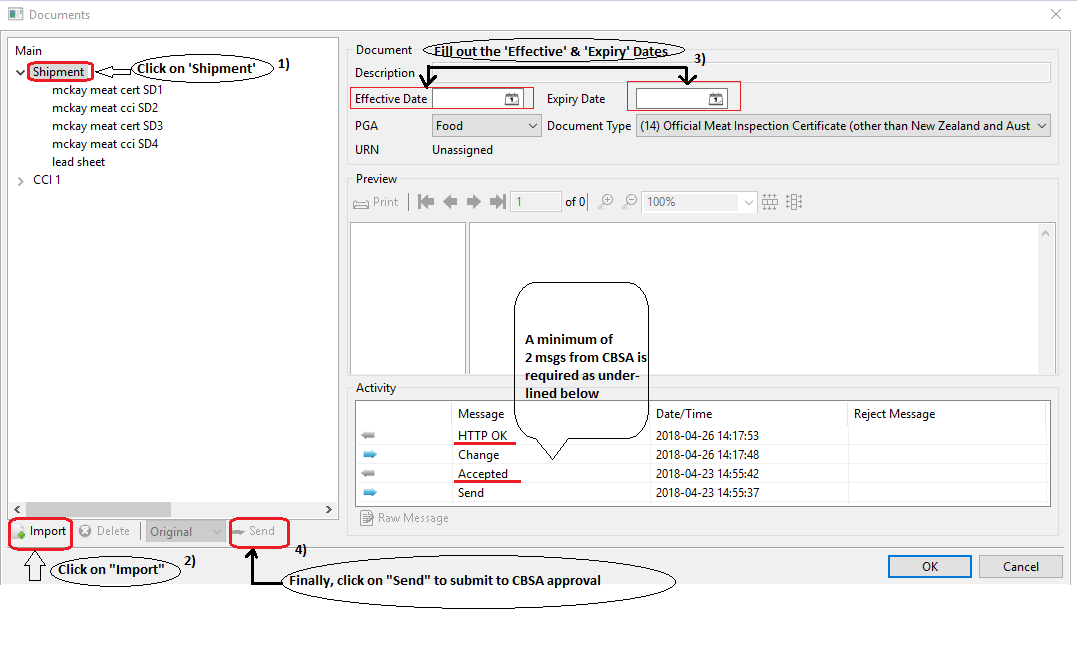
Once the above license is approved by CBSA, you will see on the CFIA window – pull down menu for that Line, the license appears to be selected.
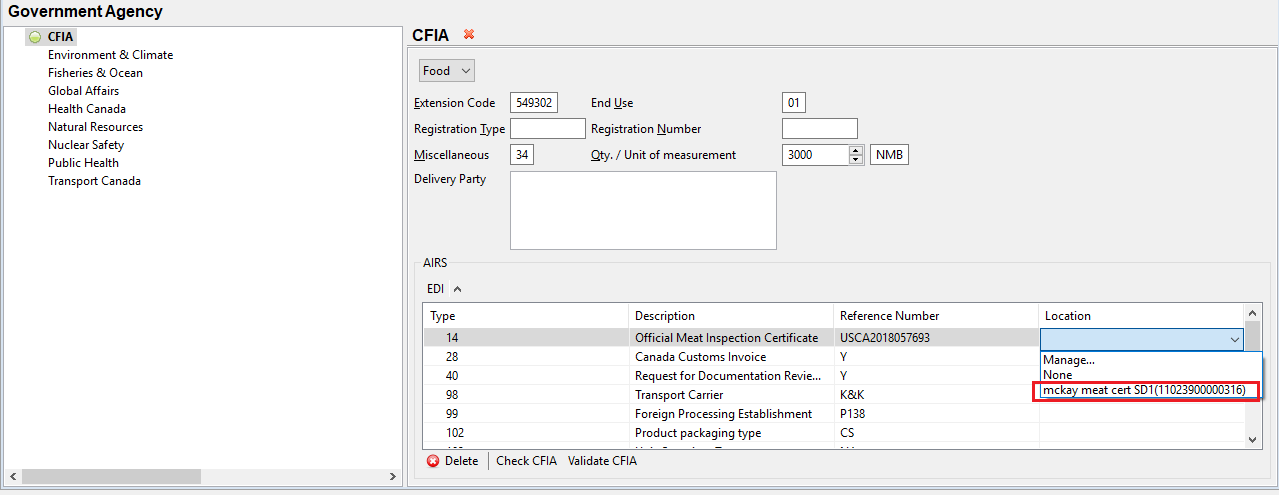
Continue the same with the rest of the CFIA lines where the Pull-Down menu appears, get it accepted by CBSA like in Step # 8, and once ‘Accepted’, go to the CFIA window and select that license from the pull down menu like Step # 9
Once the CFIA licensing & importing is approved by CBSA, click on “OK” to close the CFIA window and on the CCI Detail Entry screen, click on “Send IID” to send it to CBSA.
Comments
0 comments
Article is closed for comments.